


Etsy product photos can increase your sales significantly. With just a few tips and tricks, you can take your Etsy product photos to the next level, even if you don’t know much about cameras, photography, or photo editing. Check out our Top 5 Etsy Photography Tips for Beginners, if you want to take great shots with your phone, and make your Etsy listings stand out!
1. Create a beautiful background with things you have in your home
When it comes to the background of your photos, there are two choices that people opt for the most: a plain white background, or a beautiful background that makes the product stand out. Remember, your product needs to be the star of the photoshoot. Don’t use objects that take away all the attention from it.
For example, for vintage objects, you can use an old, open book as background:

A plain white background is also a very good choice. You can use a white large paper as the background, and place it in a well-lit space when you take the photos. Natural light is the best. It doesn’t change the colors of your products too much, so your customers can have a clear picture of what the product looks like in real life.
Check out the example below. You can add some trinkets to make your product photos more attractive, as long as your Etsy product still stands out:

Top 5 Etsy Product Photography Tips for Beginners
2. Take your Etsy product photos in daylight
Natural light is your best friend when taking product photos, especially if you don’t have much experience with editing software. A great tip is to check the weather and plan your product photoshoot on a sunny day.
We do this even when we shoot our products with a professional camera. Natural light is always better than artificial light. You will need less photo editing, and the colors will look bright and eye-catching.

But if you don’t get much natural daylight, no worries. We’ll share our favorite photo white box in this article as well!
3. Use an editing app to make your photos stand out
These are the main things we do when we edit product photos:
- increase the brightness/exposure
- slightly increase the contrast
- increase the saturation a bit, if you want the colors to be more lively
- cut the photos to make sure the product is well-centered in the frame

We usually edit our photos in Adobe Lightroom. It’s a great quality mobile and desktop photo editing app/software. It’s quite easy to use once you get the hang of it. And what’s great about it is that it doesn’t ruin the quality of your photos. However, it can be a bit challenging for absolute beginners.
If you are one, we recommend the following apps that are so easy to use: VSCO Cam, AirBrush, and Photoshop Express Editor.
Important tip: Don’t edit your photos too much. You want your Etsy product photos to showcase your product beautifully, but as close to reality as possible. By over-increasing the brightness, contrast, or saturation, you can also impact the quality of your photos in a negative way.
4. Learn from your competition
If you haven’t researched your competition yet, it’s high time you did! Etsy sellers and community members are so creative and inspiring. Don’t get discouraged by your competition, learn from it.
Scroll through Etsy products and collections and start asking questions: what type of backgrounds stand out the most to you? what type of photos would make your products shine? is still life the best type of photo for my product, or should I use a model for my photoshoots?
 Photo by Brooke Cagle on Unsplash
Top 5 Etsy Product Photography Tips for Beginners

Use different backgrounds and styles for some of your products, and see what gets you the most clicks and sales. Don’t be afraid to experiment with your Etsy product photography.
Set up your Etsy store for early success. Learn from our mistakes. These are the 7 Things we wish we knew before opening our Etsy store.
5. When all else fails, use a white light photo studio box
You cannot go wrong with a white photo background. It’s clean, it’s minimalist, it doesn’t take away any attention from the product. If your place doesn’t get much natural light, we suggest investing in a small (or large, if you seller bigger products) white light studio box.
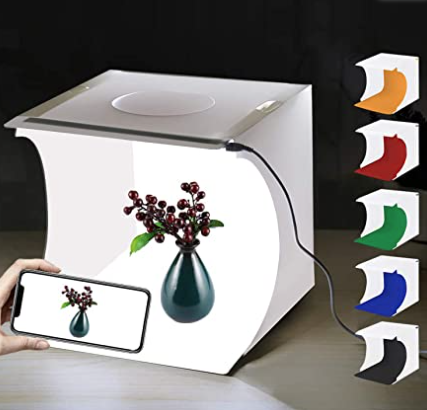
You can get it for as cheap as $9.99 on Amazon. It’s easy to use, it doesn’t take up much space, and you can fold it and put it away when you’re done shooting your products.
We’ve used it for many years to take photos for our Etsy stores. And it’s a great product, especially if you use a phone to shoot your Etsy product photos.
For more Etsy product photography tips & tricks, check out our Youtube video:
Top 5 Etsy Product Photography Tips for Beginners
We hope that you found these 5 easy tips useful and that you can now get creative with your product photos. Don’t hesitate to share your Etsy store name in the comments, to get some free exposure!
If you're at the start of your journey on Etsy, make sure to get our Ultimate FREE Guide to a Successful Start on Etsy, a step-by-step workbook to help you set up your store effortlessly:
